
Moving a Non-Profit Wordpress Site to Free Hosting on Azure - Part 2
This is a follow-up from part 1, and assumes that you have a fully functional copy of whatever Wordpress site that you’re looking to migrate at some-app-name.azurewebsites.net
Have it at your custom domain
For my websites, I use CloudFlare for DNS management. In short, even on their free plan you get DNS hosting, security protections, and can offload a large portion of your website’s load to their network making you faster. You don’t have to use CloudFlare for this, but the setup is pretty quick (setup instructions here Takes about 5 minutes for most websites). I’ll outline the steps using CloudFlare, but the steps are similar for any DNS host.
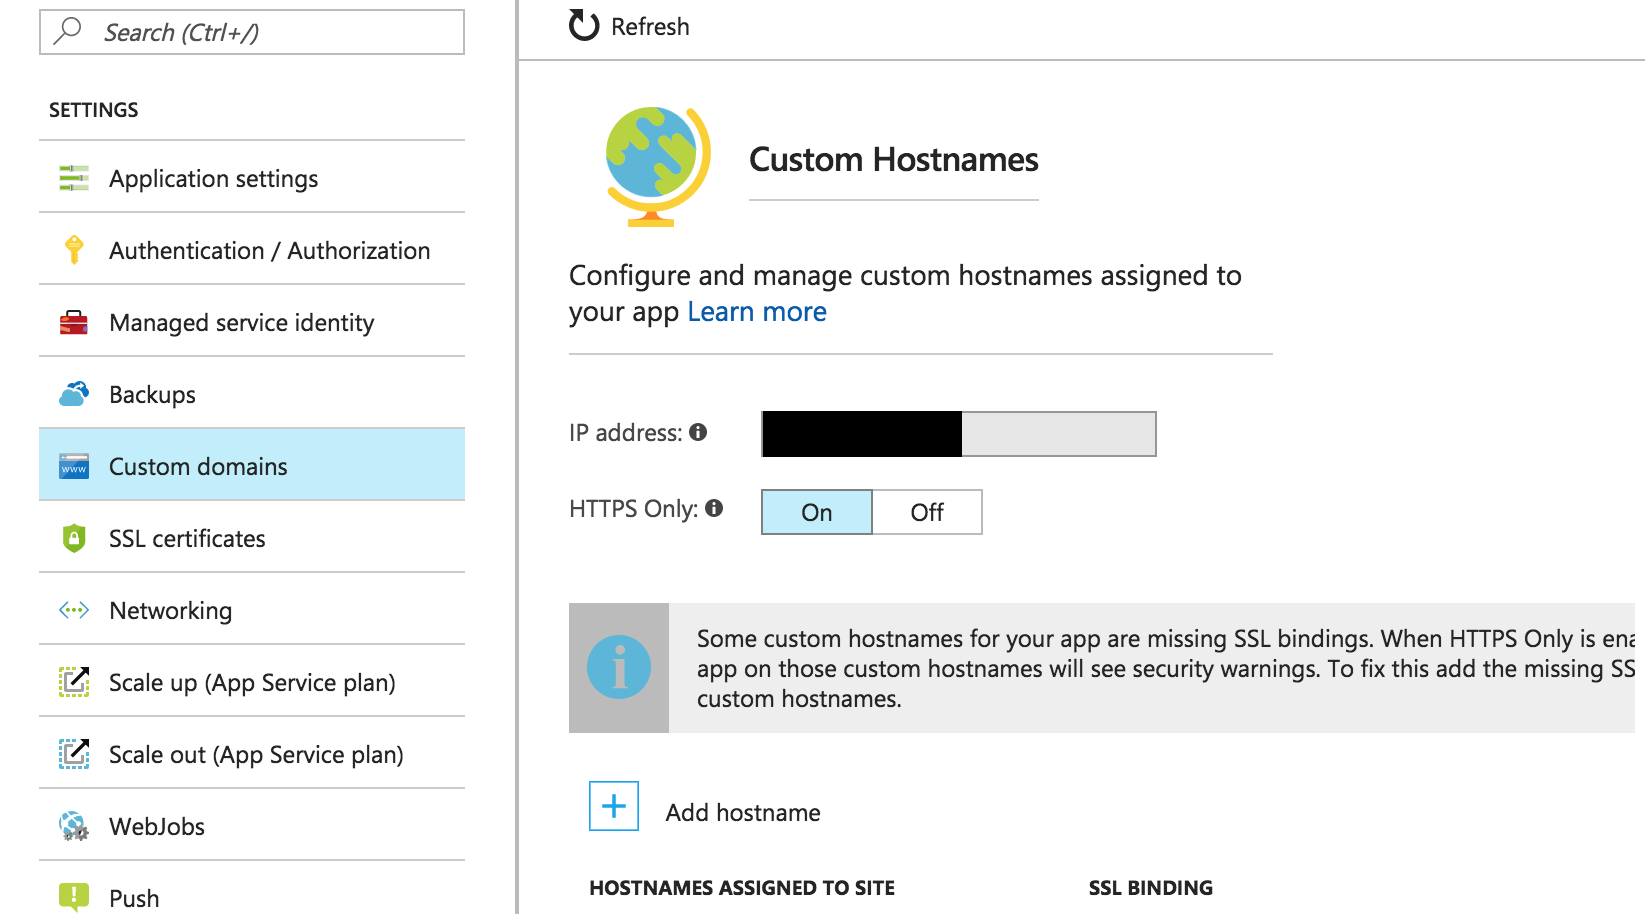
Click on your App Service and scroll down to the “Custom Domains” menu and hit the “Add hostname” button.
Up at the top, enter in whatever your custom domain name is.
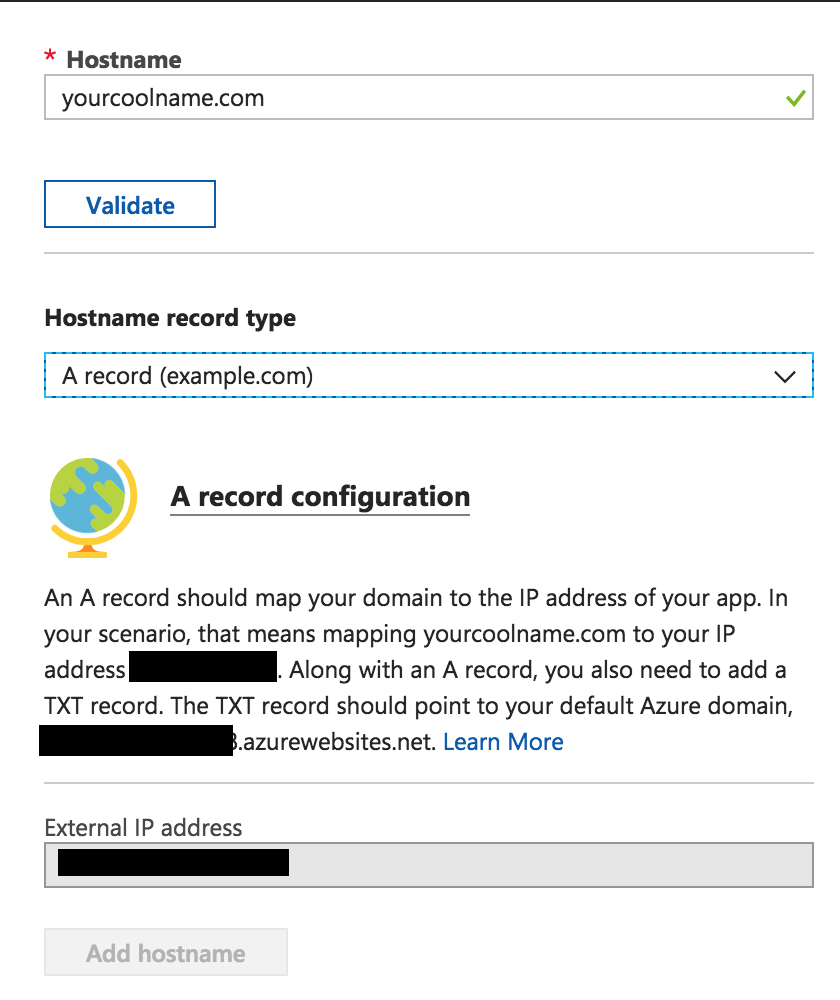
We’re going to set this up as an A record. To do this we’re going to need to add two DNS records. First you need the External IP address that you see on the hostname screen. If your external address was 1.2.3.4, you’d add a DNS record like this:

Note that for CloudFlare, you want to initially add this record with CloudFlare’s acceleration turned off (the grey cloud). After you successfully add the domain, you can add the acceleration back on but for the initial validation Microsoft is checks to make sure that the DNS is pointed directly to them and not to CloudFlare’s datacenters.
The second validation that Microsoft asks for is a DNS TXT record that reads with the direct name of your azure website. It will look like this:

Once you’ve added those two DNS records, hit the “Add Hostname” button at the bottom. Once Microsoft finishes validating your records, your website will show up both at your custom domain name and your some-app-name.azurewebsites.net.
Have it over HTTPS
You want your website to HTTPS. Even if you aren’t dealing with any credit cards, or personal information you want to secure your website using HTTPS. HTTPS is faster, gives you higher SEO rankings in search engines, and stops silly things like Comcast injecting browser pop-up adds when people visit your site.
Now if you’re not using CloudFlare, there are instructions in Azure to add and manage your own SSL certificates if you really want to, but its long, boring and a pain to make sure to manage your renewals. CloudFlare gives you a one click option for HTTPS where they manage everything.
First, you’ll need to turn CloudFlare’s acceleration back on to have CloudFlare manage stuff. Go back to your DNS tab, find the A record you added above, and click the grey cloud icon to turn it to the CloudFlare orange cloud.

Then bounce over to crypto tab, and change the dropdown to “Full”
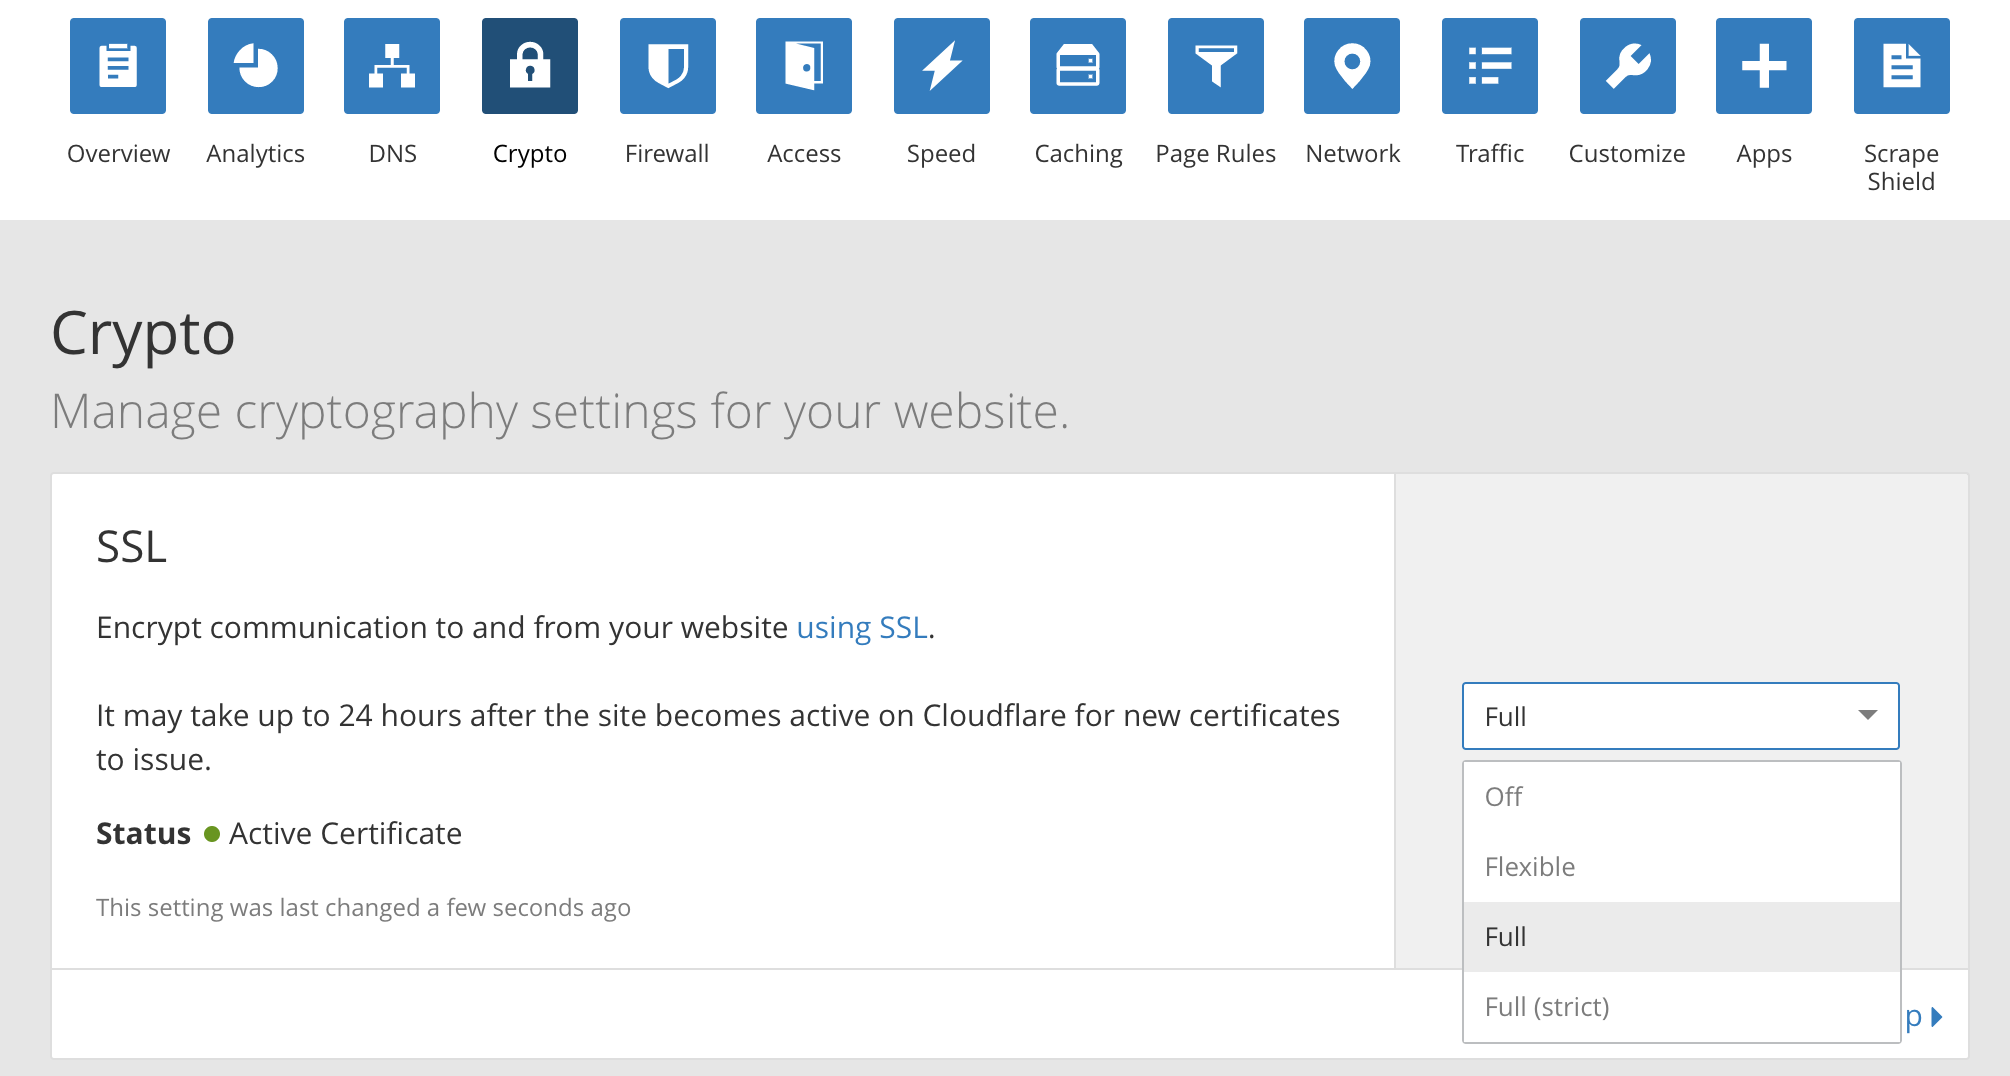
Don’t do “Full (strict)”! It will break! To add the strict version, you’ll have to manage a certificate on Azure for your domain name. For a few organizations, that additional level of protection against an attacker hijacking your backing server is important. For most of the rest of us, the “Full” setting gives us all the speed, SEO and security protection that we need while leaving all the management and cost to CloudFlare.
Have backups
Azure does have native backup functions. If you followed the instructions in part 1, the Azure database for MySQL automatically includes a month or so of backups for the MySQL database. However, restoration from those backups requires more technical skill that some non-profits have on hand, so for my org I recommend using the backWPup plugin we used in part 1 to take care of the backups. If you ever need to restore you pull down a copy of your latest backup and go back to the instructions in part 1 to restore.
Although to save space on the application service plan, I found it simple enough to setup an Azure storage account and shove the backups into there.
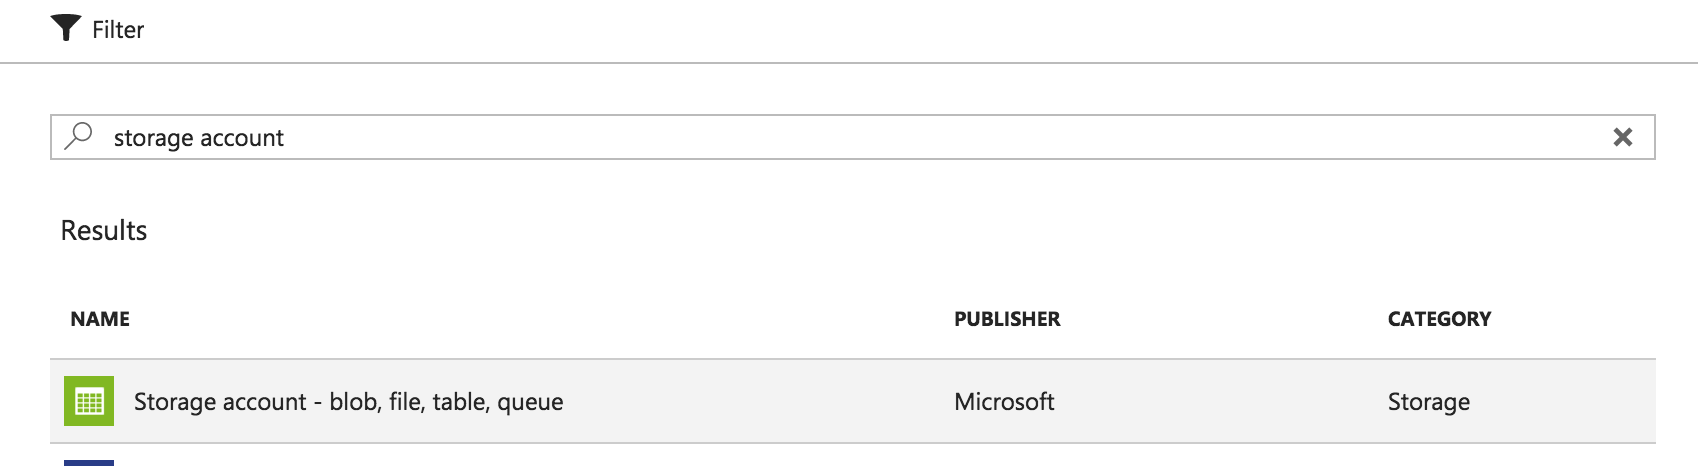
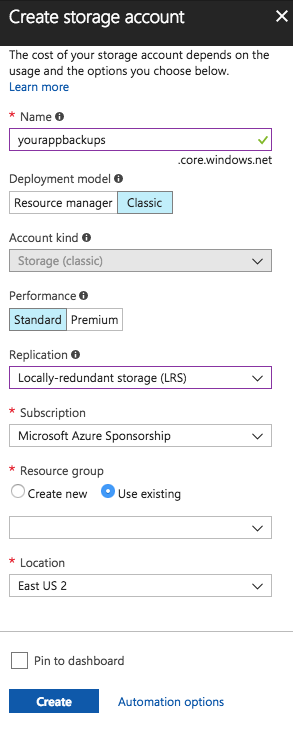
Hit “Add” on your resources tab to open up the marketplace and search for “Storage Account” Click on the “Storage Account - blob, file, table, queue” by Microsoft. It should be the top item on the search.
From there the configuration is fairly straightforward:
- Name - whatever you want, but needs to be unique using only letters and numbers
- Deployment Model - Choose “Classic” backWPup will only work with Classic storage accounts
- Performance - Standard is fine. Backups aren’t in your runtime path.
- Replication - Lowest cost Locally Redundant Storage was fine for my purposes. There’s no issue with choosing higher redundancy, but the pricing will roughly double if you upgrade to globally redundant storage.
- Subscription - Choose your sponsorship
- Resource group - I chose to drop it in my existing resource group. Either way is fine.
- Location - As it’s not in the runtime path for your website, it’s wise to place this in a different Geographic location than you main site. If your website is running in West US, for example, choose East US for your backup location
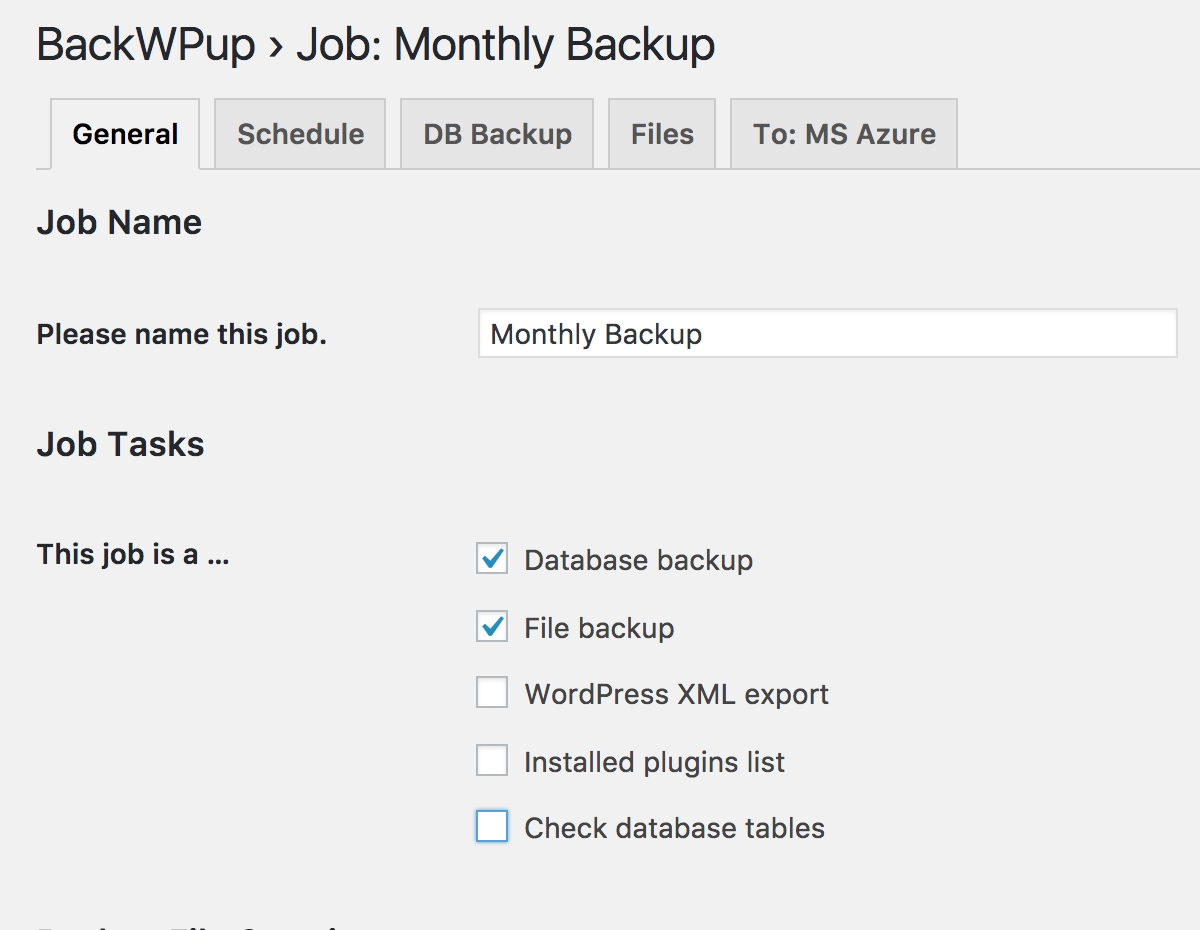
On your Wordpress site, you’ll want backWPup installed and configure it similarly to what we did to export. Create a new job, name it something, and check the “Database Backup” and “Files Backup” boxes.
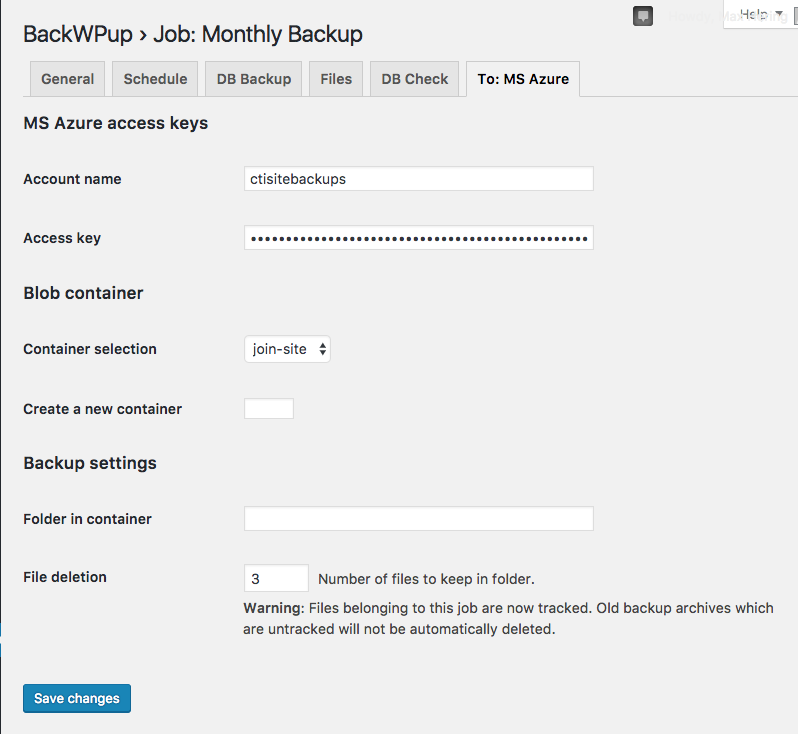
Scroll down, and select your storage config. Choose “Zip Archive” and check the “Backup to Microsoft Azure (Blob)” box
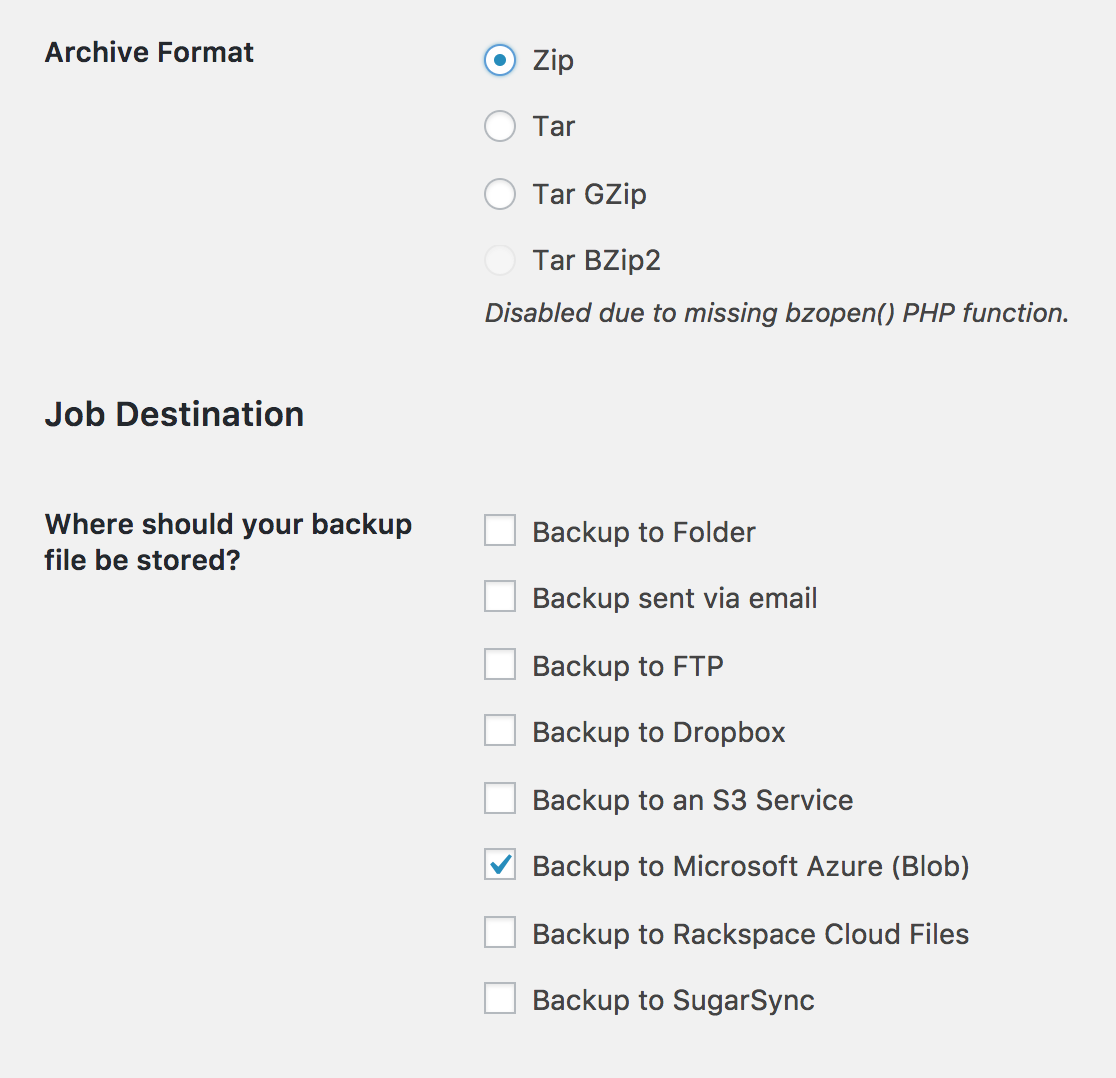
When you do, a new “To: MS Azure” tab will be made.
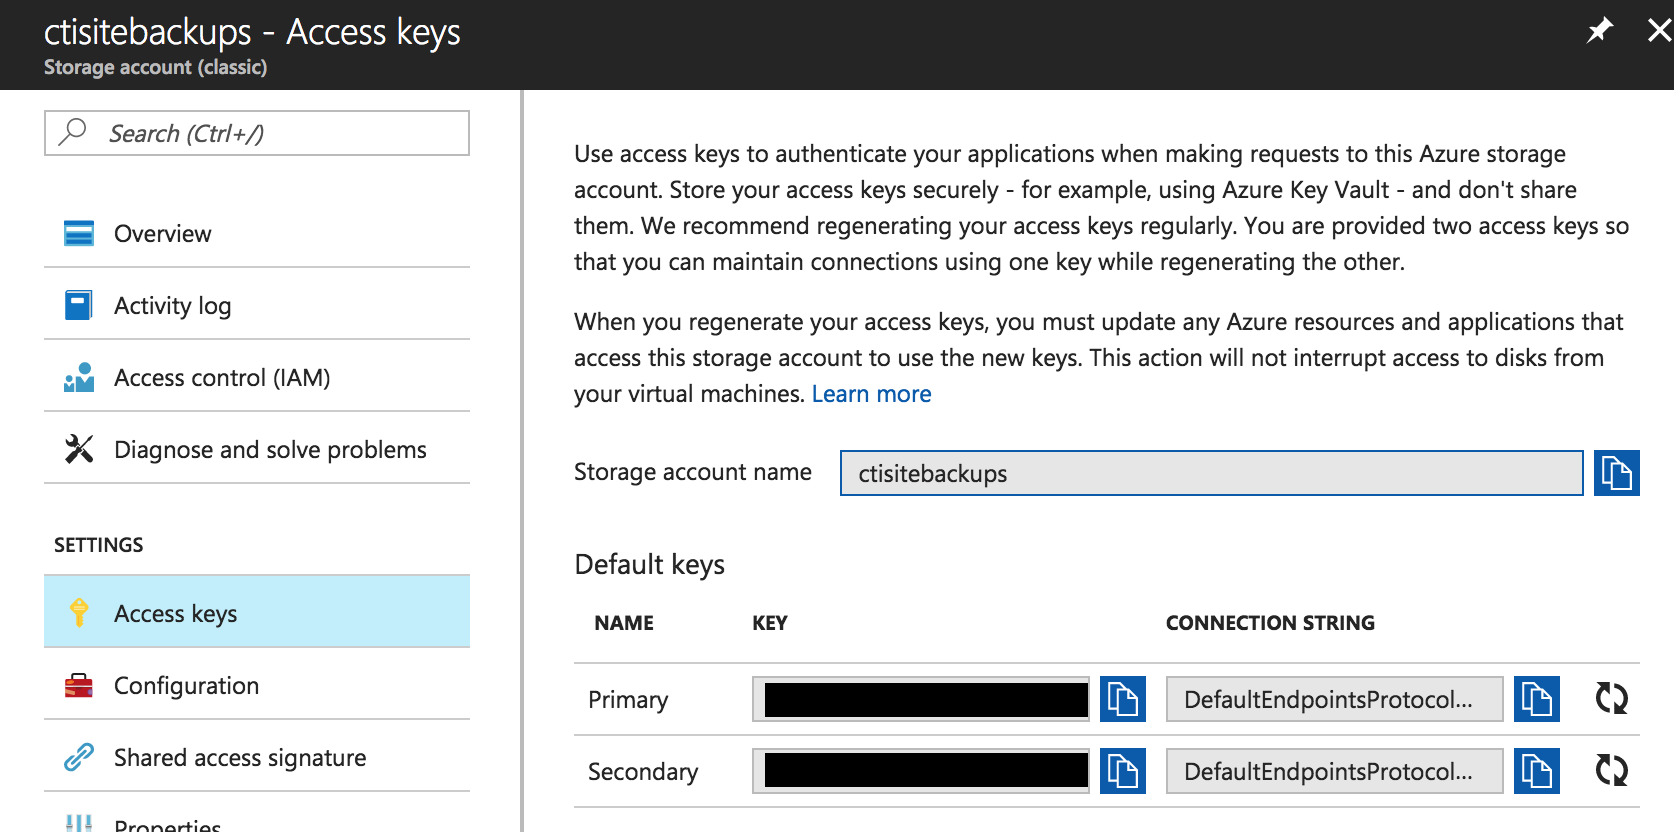
To get the information about the storage account that you need for this page, go back to the Azure portal, click on your storage account and scroll down to “Access keys” tab under settings.
Back in BackWPup, click on the “To: MS Azure” tab and select the following:
- Account Name - Copy from the “Storage Account Name” field on the “Access Keys” page
- Access Key - Copy and paste from the Primary’s Key field under “Default keys”
- Container selection - By default, your storage account will have no containers. To make one (and verify your account name and access key) type in a container name into the “Create a new container” field below it. Name it whatever you want, and the select it in this “Container selection” field.
- Folder in container - enter a value if you want these backups in a subfolder. Otherwise leave it blank
- File deletion - Decide how many backups you want to keep. You should have some number here to keep your backups from growing to infinite size, but the exact number should depend on your particular site. For one of our sub-sites that changes rarely, I back it up once a month and set this to 3 to keep a few months of backups. For our main site, I backup daily set this to 30 and keep a month or so’s worth of backups. It all depends on how frequently your site changes and how granularly you would want to have the option to restore to against the cost of storing backups.
Then hit the Schedule tab to set up your backups to run automatically.
The most set and forget options are:
- Start job - set to WordPress cron. This isn’t as precise of a scheduler as other options, but it’s already contained within your Wordpress install so there’s nothing else to worry about.
- Scheduler type - Keep on Basic
- Scheduler - set to how frequently you want the backup. Again, for some of our sites that change rarely, monthly backups are fine. If you’re site is change multiple times a day, an hourly backup might be more appropriate. All depends on the specifics of your site and how much time’s worth of data you’d be okay losing if you had to restore from a backup weighed against the cost of those backups.
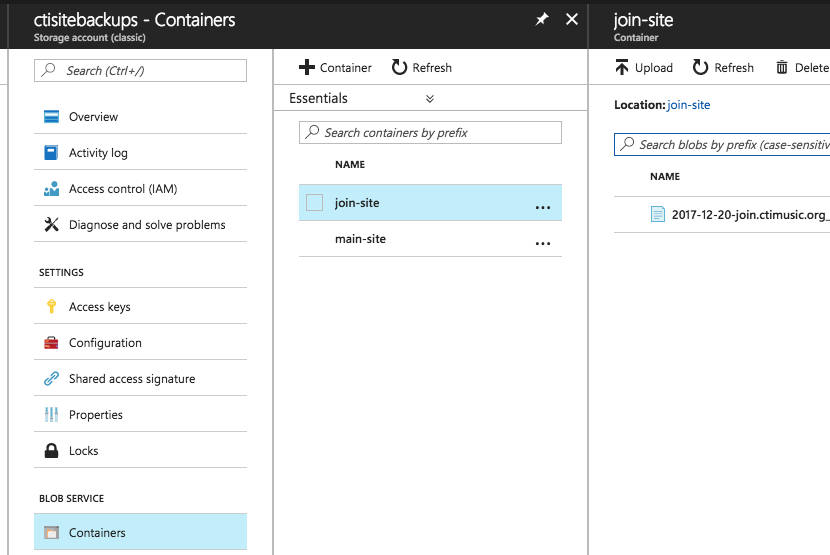
When it’s all configured, hit the “Save Changes” button on the bottom, and hit the “Run Now” link that pops up to test. Once the job finishes, you should see a backup archive when you go to your storage account > containers > your container name.
You can also download a copy locally from this page when you need to restore, or if you just want to have a local copy to backup your backups.
Have it load faster
W3 Total Cache
W3 Total Cache looks super complex with bunch of knobs and dials to it, but it’s not as bad as it might first seem. Rather than copy/paste everything, I’d recommend this walkthrough that I used for setting up W3 Total Cache with CloudFlare. Short version in case that link ever goes down:
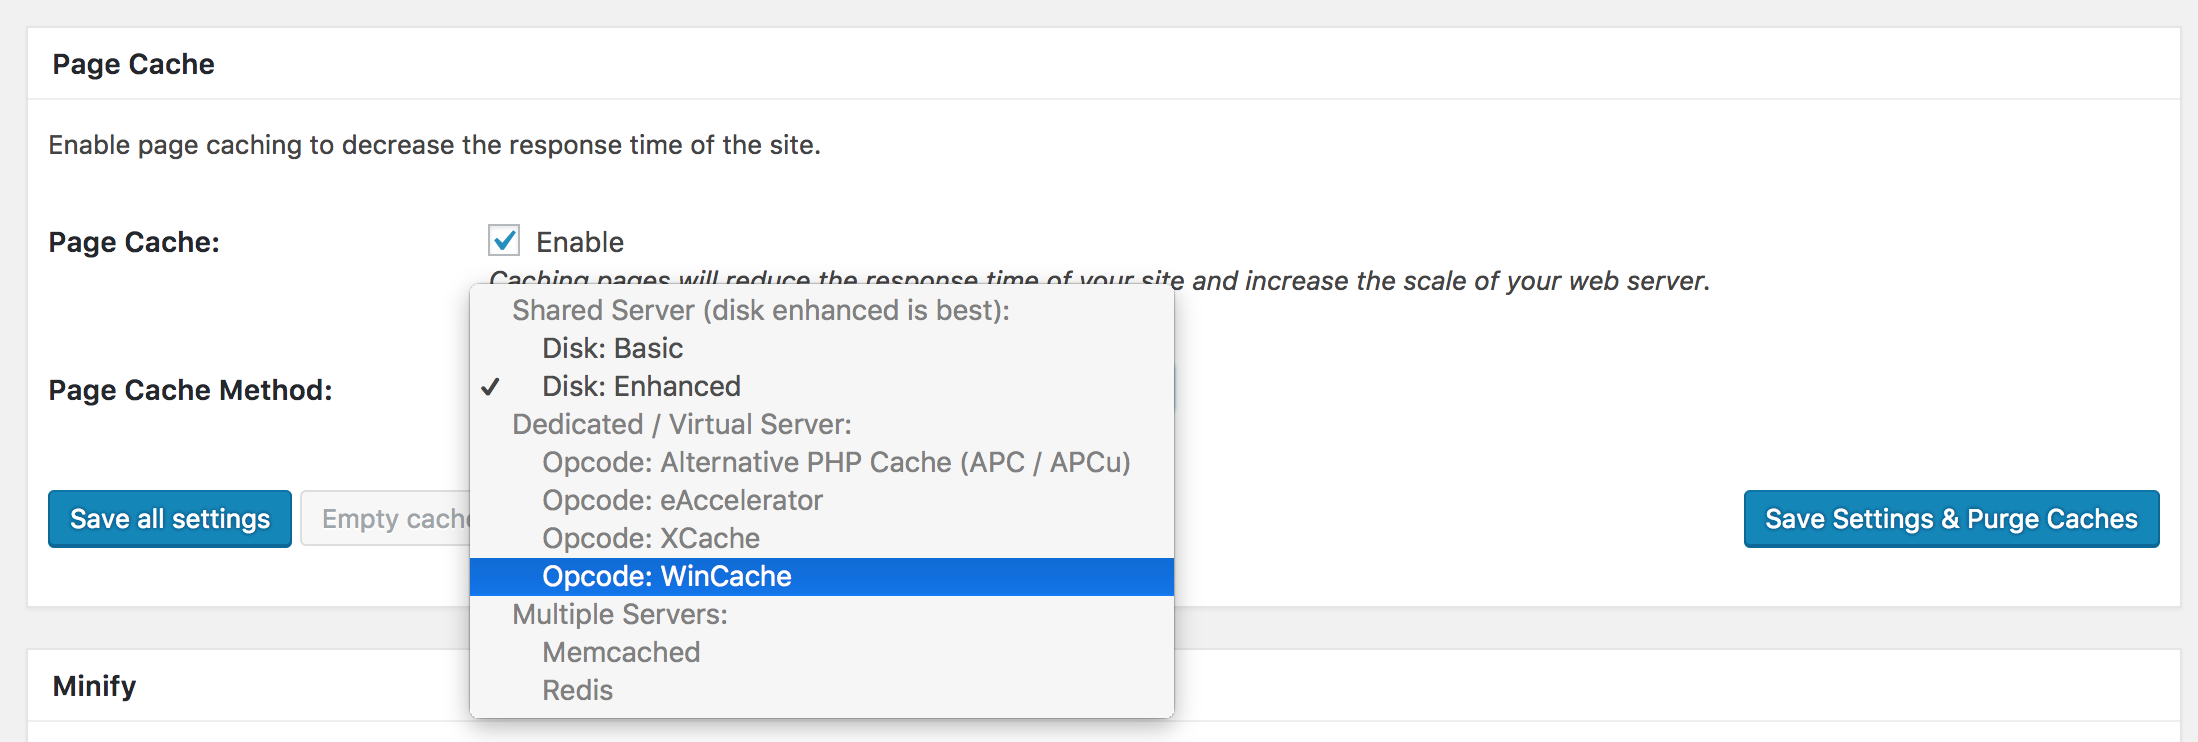
- Caching is awesome and saves work on your website than having it computer every page every time it loads (and Azure Wordpress comes with WinCache pre configured to store cache in RAM rather than disk to make the cache even faster)
- On the general settings page enable Page Cache, Object Cache, and Browser Cache from the main page. Set them all to “Opcode: WinCache” That walkthrough says set to disk, as not everyone has WinCache. WinCache is faster.
Lazy Load Images
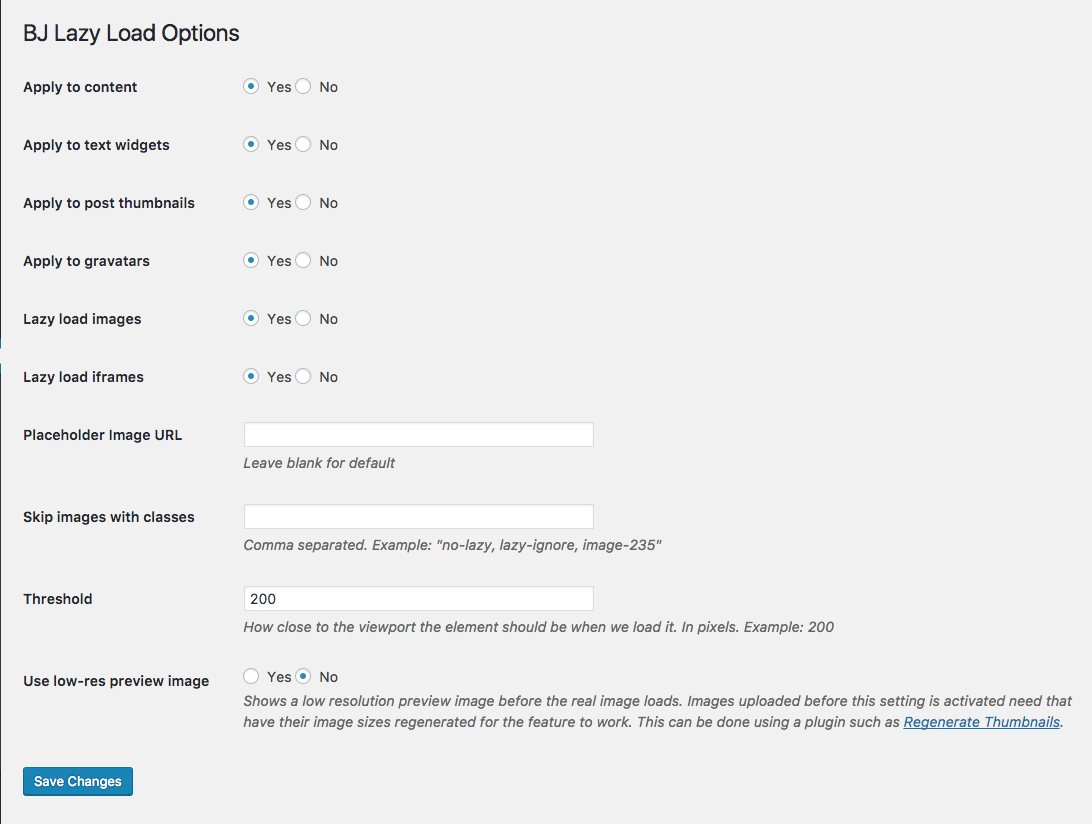
Lazy loading images stops images loading outside of the visible screen from holding up the page from fully rendering. It makes the initial load faster, and it helps save data for any folks viewing your site from mobile phones. I used BJ Lazy Load and it just works out of the box with the defaults.
Optimize Images
WP Smush optimizes your existing uploaded images, compressing them for the web. Install it. Hit the “Smush” button. Enjoy faster loading of the compressed images.
And that’s it. Enjoy your free, faster, auto-backed up and HTTPS Wordpress website!