
Two ways to protect SSH with multifactor authentication
Here’s two methods to protect SSH with multi-factor setup. Quick disclaimer, the scripts below are built generically and require you to do a bit of additional work of inserting your own secrets. If you just run these scripts without inserting your own keys or API tokens, you won’t be able to pass the second factor challenge and you can permanently lock yourself our of your own system. The scripts will take you 90% of the way, but be sure to do the follow on steps.
Also, these are scripts setup for Debian based systems, including Ubuntu and Rasbian, (my initial use case) but the same basic process with just slightly different package manager installation commands should work with most linux based systems.
Okay? Here we go.
Wait, what is multifactor authentication?
Skip this if you know, but for those who don’t here’s a quick overview. Passwords alone aren’t particularly great for authentication. People aren’t great at remembering them so they often reuse them, and even without reuse passwords can be guessed.
Even if you’re a security professional and choose only 100 random character passwords that can only be brute-force guessed if you have more time than the universe exists, you still have a possibility that if your password can get compromised by a particular well crafted phishing attack or some vulnerability in your password manager.
Multifactor authentication can help mitigate some of the weaknesses of using a password alone. In general, identification of people can be done through a few ‘factors’
- The factor of something that you know, like how knowing a password can get you into an account. This is pretty common in computer security; basically the default.
- The factor of something that you have, like how someone having the key to your house lets you inside.
- The factor of something that you are, like how a hair left at a crime scene can be used to identify a person.
Any one of these factors can be broken; passwords can be guessed, house keys can be stolen, and hair could be planted at a crime scene. The idea behind multifactor is that if you require 2 or 3 of these factors instead of just one, the cost to an attacker trying to break into a system goes up. Multifactor authentication is not perfect security, but it is more secure.
Using time-based one time password (TOTP) with Google Authentictor
First up is using a time-based one time password. The Google Authenticator package system is a pretty dead simple method to set it up. It’s free both in beer, and in as in open source free software.
Time based one time passwords are done by having both the system that you’re authenticating to and whatever mobile app you’re using to calculate a specific function and come up with the same value. You can look up the details in the RFC, but the short version is this is a function that takes two variables - the current time and a seed value of an original secret used to set this up - and outputs what appears to be 6 random numbers. It’s strong in that without knowing those two things, you can’t get the numbers and knowing one of the strings of 6 numbers doesn’t really give enough information to try and guess what the next set of numbers would be.
This is multifactor in that if that secret is only on the system you authenticate against and whatever mobile device you’re using to calculate, then knowing the 6 digit answer that comes out is a proof of “something you have.” Knowing the variables (time, original secret) of this function is helpful to know the compromise vectors. If your system and your cell phone can’t agree on the time, they won’t agree on the TOTP. Having NTP configured helps, but if an attacker can poison the time on a system or your TOTP app/device or if it’s just badly misconfigured you’ll not be able to log on.
The second vulnerability is if an attacker knows your initial seed, they know your TOTP. This initial seed can be either a string of characters or a QR code. If you keep a backup of this seed, store it as safely as you would a password. Print it out and keep it in a locked offline location, or keep it stored encrypted in a password manager like KeePass, or a other encrypted volume.
To start download the Google Authenticator app for your mobile platform of choice, and then run the commands in this script.
Now, hopefully I’ve commented enough for you to understand what’s going on, but as a short overview is:
- Installing the Google authenticator PAM (Pluggable Authentication Modules) module
- Changing the PAM requirements for for SSH to include the Google authenticator PAM module
- Changing SSH configuration to allow input of the 6 digit code PAM requires
Now what this script doesn’t do is tell the system what the secret seed is. You need to give the system a secret seed for the TOTP system to work or you won’t be able to log in!
Follow on steps for the TOTP script
So here’s what you need to do to give the initial seed. The simplest method is running the google-authenticator script that comes installed with the Google Authenticator PAM module with the user you will be using the TOTP auth with. It looks something like this.
$ google-authenticator

Do you want authentication tokens to be time-based (y/n) y
https://www.google.com/chart?chs=200x200&chld=M|0&cht=qr&chl=otpauth://totp/fake-user@raspberrypi%3Fsecret%3DN3NLNRWYRMXMXT35YB6OTRFOCY%26issuer%3Draspberrypi

Your new secret key is: N3NLNRWYRMXMXT35YB6OTRFOCY
Your verification code is 324891
Your emergency scratch codes are:
  35031575
  32106214
  48445777
  45228491
  13063895

Do you want me to update your "//.google_authenticator" file (y/n) y

Do you want to disallow multiple uses of the same authentication
token? This restricts you to one login about every 30s, but it increases
your chances to notice or even prevent man-in-the-middle attacks (y/n) Do you want to disallow multiple uses of the same authentication
token? This restricts you to one login about every 30s, but it increases
your chances to notice or even prevent man-in-the-middle attacks (y/n) y

By default, tokens are good for 30 seconds. In order to compensate for
possible time-skew between the client and the server, we allow an extra
token before and after the current time. If you experience problems with
poor time synchronization, you can increase the window from its default
size of +-1min (window size of 3) to about +-4min (window size of
17 acceptable tokens).
Do you want to do so? (y/n) n

If the computer that you are logging into isn't hardened against brute-force
login attempts, you can enable rate-limiting for the authentication module.
By default, this limits attackers to no more than 3 login attempts every 30s.
Do you want to enable rate-limiting (y/n) y
A few notes here.
If you say yes to the first question of having these authentication tokens to be time based, the next line is going to be a URL (like this) that you can go to in a browser to see a QR code that you can use for easy entry into the Google Authenticator app.
Second note, the next line is your secret key. You can enter this manually into the Google Authenticator app to do the same as the QR scanning setup.. This is the variable that verifies you. Protect it like your password, or your house key!
Next line is asking if we want the script to update your .google_authenticator file in your home directory. This file is referenced by the system to check the TOTP passwords that you give it and has your secret key. If a file with that secret key is not there, you can’t log in. If someone else can read it, they have your TOTP key. If someone else has root on this system, assume they also have your TOTP factor.
If you keep rebuilding systems over and over, or want to use the same TOTP key across systems rather than scanning a bunch of QR codes, simply drop the same .google_authenticator file in the home directory of users that you want to use the same TOTP code for, the file is owned by the user that will use it for auth, and make sure that the permissions are 0600 (readable only by the user that will use it for authentication). Once done, you can use the same 6 digit code to do multifactor authentication across multiple systems.
The following three questions aren’t essential to make it work, but are more about the question of your risk tolerance. The more permissive you make things, the less likely that edge cases in technology will inadvertently break things, and the more easily an attacker can log in. The less permissive you make things, the harder it is for an attacker but the more likely that something not actually malicious will prevent you from logging in to your system. In general, unless you have a threat model of people targeting you directly, even choosing the most permissive answers puts you vastly ahead people using only password based authentication.
Using Duo for Shinier Multifactor Authentication
TOTP is great. It’s a massive upgrade above just password based authentication. It also adds more friction to the login path. In addition to just having a password, I need to enter more stuff. Adding a bit of friction to legitimate users is inevitable when you add another factor to a authentication process, but particularly if you’re authenticating often reducing a little bit of that friction can add up. Duo is fantastic in supporting a host of other multifactor auth methods - hardware yubikeys, automatic pushes to a smartphone, even pushing to your Apple Watch - and for most people’s personal use it’s free (as in beer, not as open source software).
Setup is fairly simple.
First, signup for a Duo account - https://signup.duo.com/
Second, set up a user for yourself. This has to be different than the admin user you created for the Duo signup. If you’re using the default Raspberry Pi username ‘pi’ or other usernames for SSH be sure to add that as an username alias to your login user. 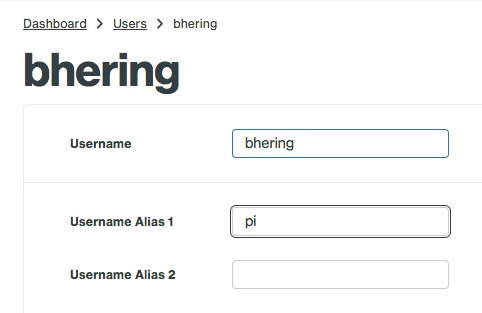
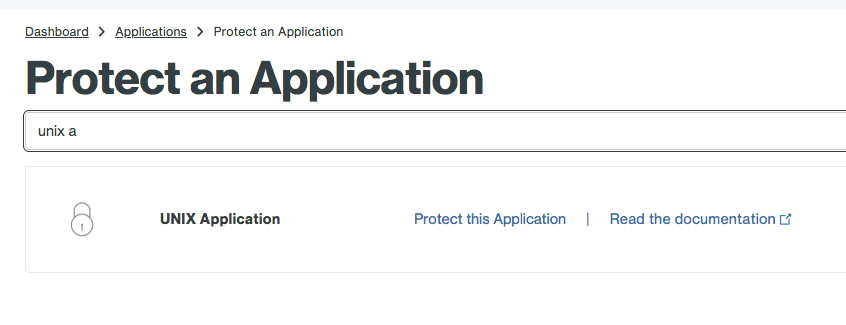
Third, you’ll need to setup an “unix application” to protect.
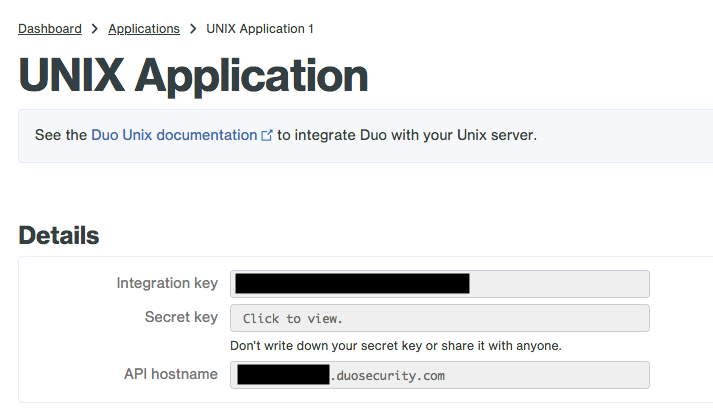
On this page, you’ll get your integration key, secret key and API hostname. You’ll need all three later on.
You can find more details here, but most of what you need to do for setup can be found by this script.
Follow on steps for the Duo script
Similar to Google TOTP script, if you run this just by itself, you’re going to break stuff. You need to add to it the integration key, secret key and API hostname. Spin up your favorite command line text editor, and add those values to /etc/duo/pam_duo.conf
[duo]
; Duo integration key
ikey = INTEGRATION KEY
; Duo secret key
skey = SECRET KEY
; Duo API host
host = API HOSTNAME
Leave open your primary SSH session and test this with a new terminal. If everything is setup correctly, you should get something when you login that looks like this.
$ ssh pi@192.168.1.133
Password:
Duo two-factor login for bhering

Enter a passcode or select one of the following options:

 1. Duo Push to XXX-XXX-XXXX
 2. Phone call to XXX-XXX-XXXX
 3. SMS passcodes to XXX-XXX-XXXX

Passcode or option (1-3):
In that passcode option, you can either enter the 6 digit TOTP available on the Duo app or select one of the three options to verify. NOTE - Duo Pushes are free, phone and SMS codes cost “telephony credits” that cost money to renew.
But what if I use SSH keys? I don’t use passwords for SSH!
Good! SSH keys are way better for authentication than passwords. SSH private/public key authentication is stronger than most passwords, and unlike passwords if an attacker compromises a server that you log into with an SSH key they can’t reuse that login information to compromise another system that uses the same authentication method (opposed to if you use passwords, an attacker could compromise it and use it on other systems). In general, SSH keys are considered a file you have, so adding another “have” factor in TOTP or DUO isn’t generally adding another “factor” or dimension to your authentication scheme. Keep using SSH keys where you can!
Additionally, Duo’s PAM module has the ability to combine SSH keys with multifactor push. Change the following settings in your /etc/ssh/sshd_config
PubkeyAuthentication yes
PasswordAuthentication no
AuthenticationMethods publickey,keyboard-interactive